
Rigging a fly rod may seem intimidating, but with the right technique, it’s a straightforward process. To begin with, select your fly line, leader, and fly of choice. Attach the backing to the reel, then the fly line, using proper knots for security. Next, add a leader to your setup, followed by the fly. Practice tying knots with precision for a successful rigging every time. Remember, mastering how to rig a fly rod opens up a world of exciting fly fishing opportunities.

How to Rig a Fly Rod: A Beginner’s Guide
When it comes to fly fishing, properly rigging your fly rod is essential for a successful and enjoyable fishing experience. Whether you’re a beginner or looking to refresh your skills, understanding the basics of rigging a fly rod is crucial. In this comprehensive guide, we will walk you through the step-by-step process of setting up your fly rod like a pro.
Understanding the Components of a Fly Rod
Before diving into the rigging process, let’s familiarize ourselves with the different components of a fly rod. A typical fly rod consists of the rod itself, a fly reel, fly line, backing, leader, tippet, and of course, the fly. Each component plays a vital role in casting and presenting the fly to the fish effectively.
Step 1: Assemble Your Fly Rod
The first step in rigging your fly rod is to assemble the rod by connecting the different sections. Start by carefully aligning the guides and gently joining the pieces together. Make sure each section fits snugly to avoid any wobbling during casting.
Step 2: Attach the Reel
Once your fly rod is assembled, it’s time to attach the fly reel. Secure the reel to the reel seat located at the bottom of the rod. Most reels have a locking mechanism that allows you to easily fasten them in place. Double-check to ensure the reel is firmly attached before moving on to the next step.
Step 3: Spooling the Fly Line
Spooling the fly line onto the reel is a crucial step in rigging your fly rod. Begin by threading the end of the fly line through the rod guides and into the reel’s spool. Slowly wind the line onto the spool while keeping it taut to prevent any tangles or twists. Fill the reel with an adequate amount of fly line, leaving some space for backing.
Step 4: Adding Backing
Backing is a thin, strong line that is attached to the reel before the fly line. It serves as a reserve line that provides extra length and helps prevent your fly line from getting spooled entirely by a big fish. Attach the backing to the reel and then tie it to the end of the fly line using a secure knot.
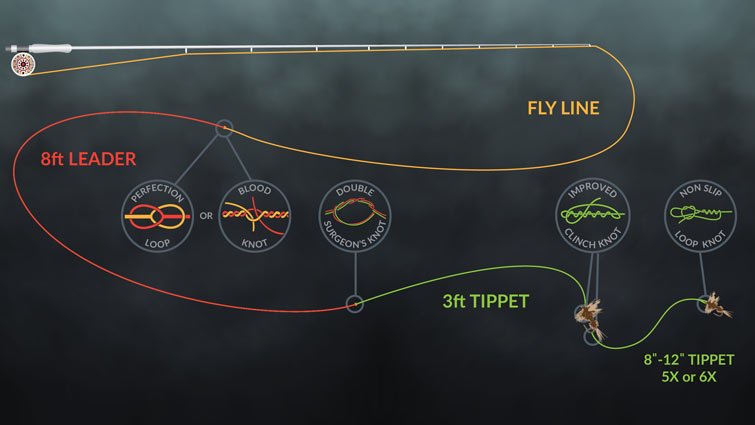
Step 5: Connecting the Leader
The leader is a clear monofilament or fluorocarbon line that is attached to the end of the fly line. It helps to transfer energy smoothly from the fly line to the fly during casting, resulting in more accurate presentations. Connect the leader to the fly line using a nail knot or loop-to-loop connection for easy setup.
Step 6: Adding the Tippet
The tippet is a thin, transparent line that is connected to the end of the leader. It serves as the final extension between the leader and the fly, allowing for a more natural presentation in the water. Tie the tippet to the leader using a strong knot like the improved clinch knot or the double surgeon’s knot.
Step 7: Tying on the Fly
The last step in rigging your fly rod is attaching the fly to the end of the tippet. Depending on the type of fly you’re using and the fishing conditions, you can choose from a variety of knots to secure the fly to the tippet. Popular knots include the clinch knot, improved clinch knot, and the non-slip loop knot.
Tips for Successful Rigging
Rigging a fly rod may seem daunting at first, but with practice and patience, you’ll become more efficient at setting up your gear. Here are some tips to help you rig your fly rod like a pro:
Practice Knot Tying:
Take the time to practice tying the various knots needed for rigging your fly rod. The more familiar you are with the knots, the quicker and easier it will be to set up your gear on the water.
Carry Extra Tippet:
It’s always a good idea to have extra tippet materials in your fly fishing vest or tackle box. Tippet can get worn out or damaged during fishing, so having spares on hand will ensure you’re ready for any situation.
Adjust Your Leader Length:
Experiment with different leader lengths to find the right balance between accuracy and presentation. Shorter leaders are ideal for casting in tight spaces, while longer leaders are better for delicate presentations in clear water.
Keep Your Gear Organized:
Staying organized while rigging your fly rod can save you time and frustration on the water. Use gear organizers or pouches to keep your fly line, leader, tippet, and flies neatly arranged and easily accessible.
Mastering the art of rigging a fly rod is a fundamental skill that every fly angler should possess. By following the steps outlined in this guide and incorporating the provided tips, you’ll be well on your way to setting up your fly rod with confidence and efficiency. Remember, practice makes perfect, so don’t be afraid to spend time honing your rigging skills both on and off the water. Tight lines and happy fishing!
ORVIS – Fly Fishing Lessons – How To Set Up A Fly Rod
Frequently Asked Questions
How do I attach the backing to my fly reel?
To rig a fly rod, start by attaching the backing to your fly reel. Begin by tying the backing to the spool using an Arbor knot. Make sure to secure the knot tightly to prevent any slippage. Then, wind the backing onto the spool evenly to avoid any tangles or knots that may affect your casting.
What is the correct method to attach the fly line to the backing?
After securing the backing, the next step in rigging a fly rod is connecting the fly line to the backing. Use a Double Surgeon’s Knot to join the backing and fly line together. Ensure the knot is tight and trimmed for smooth casting. Once connected, carefully spool the fly line onto the reel in the right direction.
How should I attach the leader to the fly line?
To complete the rigging process, attach the leader to the fly line. Tie a Nail Knot or a Loop-to-Loop connection for a strong bond between the leader and fly line. Trim any excess line for a neat finish. The leader is vital for presenting the fly accurately and should be attached securely to avoid any fish escapes during the catch.
Final Thoughts
In conclusion, understanding how to rig a fly rod is essential for successful fly fishing. Start by attaching the reel to the rod, followed by threading the line through the guides. Next, tie on a leader and attach a fly to complete the setup. Practice these steps to efficiently rig your fly rod and enhance your overall fishing experience. Remember, proper rigging is key to casting accurately and presenting your fly effectively to catch more fish. Enjoy the process and happy fishing!


